
Major William G. "Billy" Barker
Canadian Ace, Sopwith Camel and Snipe Pilot
By Stephen Sherman, Aug. 2001. Updated April 11, 2012.
Like many good fighter pilots, he grew up with horseback riding, shooting, and hunting birds. Born in Dauphin, Manitoba province in 1894, he joined the 1st Canadian Mounted Rifles at the start of the War and arrived in Europe in mid 1915. As a machine gunner, he soon had enough of the filth and horror of the trenches. He successfully applied to the RFC to become an Observer, and joined No. 9 Sqn in March 1915, based at Bertangles, crewing B.E.2c reconnaisance planes.
A year later, he was commissioned 2nd Lieutenant and posted to No. 4 Sqn, still as an observer specializing in the infant art of photo-reconnaissance.
The Somme
The British launched their disastrous offensive of the Somme in July, 1916, which meant even more needs for aerial observation, bombing, and artillery spotting. Barker, still an observer, was in the thick of the action, taking a piece of shrapnel in the leg and even shooting down two German Roland scouts. He transferred to No. 15 Sqn in mid-July and earned a Military Cross for his actions one day in late September when he fought off two attacks by German Albatros D2's and completed their photography mission.
Barker applied for pilot training in November, 1916. Back in Narborough, he soloed after only one hour of dual-instruction. He was back at the front by January, now with No. 15 Sqn, at the controls of a reconnaissance R.E.8. Survival, as much as anything else, soon led to his promotion - - to Captain, in charge of 'C' Flight. In March, he also earned another promotion and a bar to his Military Cross, for a hazardous low-level recon flight, when he took a lot of damage to his R.E.8, but accurately directed British artillery onto two German cannon.
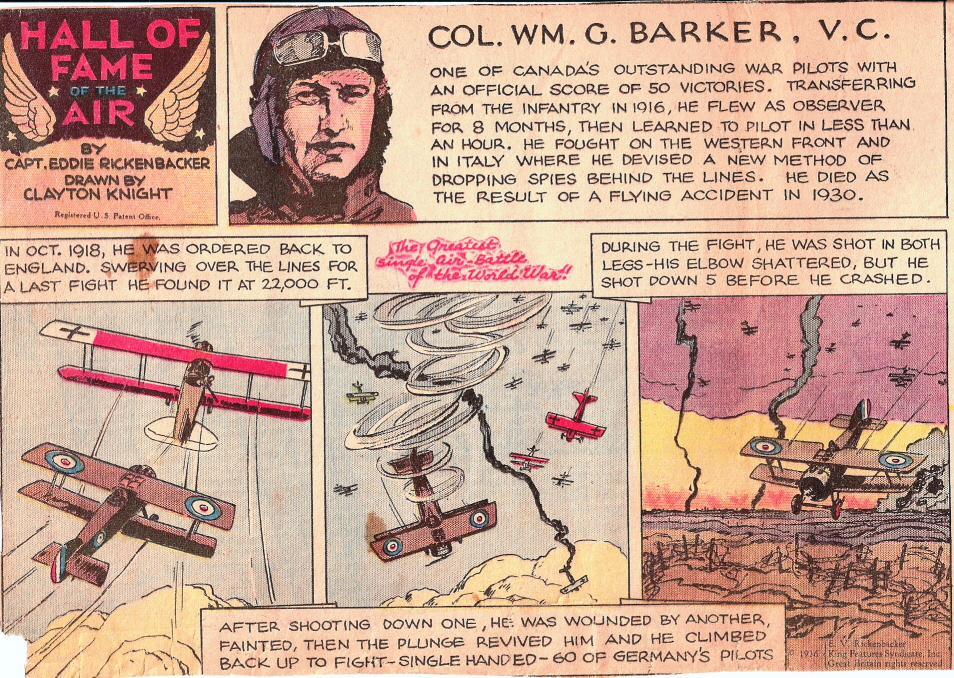
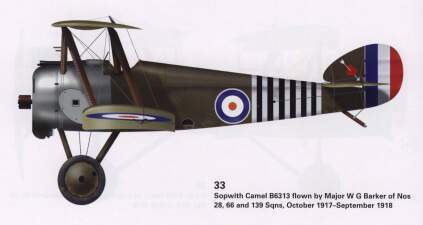
He was wounded again in August, this time in the head. By way of recuperation, he was assigned as an instructor in September, 1917. During this stint, he first flew the aircraft that would become the most successful British fighter of war, the Sopwith Camel. He also began flying Camel #B6313, which (unusually) for WW1 pilots, he would fly for a year and decorate with kill markings. This aircraft would become the most successful fighter plane in the history of the British flying services. He went back to the Front in October, with No. 28 Sqn, a close support unit, flying Camels. On October 20, he flew his first combat patrol in a Camel; within a week, he had downed three Albatros scouts.
Italy
Shortly, with the Italians reeling from their defeat at Caporetto, the French and British each rushed four airplane squadrons to help, including Barker's No. 28 Sqn.
Its duties included protecting the recon planes, preventing Austrian planes from getting over the Allied lines, shooting down observation balloons, and carrying the aerial war across enemy lines. But it was a different war from the stinking misery of the trenches in France; the Alps lay in the distance; and the local landscape was still beautiful and green. Before the British arrived, the Austrians had overwhelmed the Italians; the Camel-equipped British were a different matter. On the 29th of November, Barker's flight of four Camels met a dozen Albatroses over Pieve di Soligo. Barker dived on one and fired off fifty rounds. They levelled off at five thousand feet, and Barker's Vickers guns spewed another eighty rounds, sawing off both an upper and lower wing from the Albatros.
Holiday Raids
On Christmas Day, Barker and Steve Hudson, staged an unauthorized raid on the aerodrome at Motta, even dropping a mocking holiday greeting to their foes, along with liberal machine gun fire and twenty-pound Cooper bombs. Annoyed at this violation of the informal, traditional Christmas truce, the Austrians retaliated the next day (Boxing Day, when then British might presumably still be celebrating). In the event, it was the Austrians, some of whom were still drunk, who should have stayed in bed. On the morning of the 26th, a ragged, disorganized collection of Austrian planes approached the British air base at Istrana. A few dropped bombs and then turned for home. Barker and the other British Camel pilots scrambled and tore into the Austrian machines, destroying a dozen of them.
As they flew back to Istrana, they spotted a flight of German Gotha twin-engined bombers. Barker circled them warily, then came in low and from the front, firing upwards into the fuselage of the lead Gotha. Under the face of his relentless attacks, the big German bombers turned back.
He continued his celebrating the holidays by destroying another Albatros on New Year's Day, 1918. He was escorting some R.E.8 recon planes when the unwary Albatros made after them. Barker waited until the Austrian was committed to his dive, and then he opened fire, sending the Albatros plunging down. A few days later, he received the Distinguished Service Order (DSO), second only to the Victoria Cross among British military decorations.
Balloon Busting
Barker became one of the top British "Balloon Busters," credited with destroying nine gasbags; seven of these claims, he shared with his frequent aerial hunting companion Lt. Harold B. "Steve" Hudson. Barker shot down two in December, 1917. On January 24, 1918, he and Hudson took off on an alleged "practice" flight. Somehow, they managed to find and destroy two kite balloons during this so-called "practice" run. Three weeks later, on Feb.12, the duo outdid themselves. Again while supposedly "testing guns," they crossed the Piave when a heavy, low mist offered a good opportunity for balloon-busting. Turning east from Conegliano, they found five Drachen, two big and three smaller ones. Protected from accurate ground fire by the mist, the two Canadian aces attacked, flamed, and destroyed all five. Barker and Hudson's teamwork presaged the later standard tactical device of leader and wingman.
Spy Drops
Barker's derring-do extended well beyond fighter combat; it included dropping spies behind enemy lines. Flying an Italian bomber (which type was not recorded, but probably a Caproni CA.3), they rigged a trapdoor and packed the spy into the fuselage. The trap door allowed Barker to drop the spy at the right place and the time, without the spy's active participation. On one mission, he and Wedgwood Benn flew in low, alone, and in the dark, to drop a crate of homing pigeons to the spy below. For these missions, Italy's King Victor Emmanuel III awarded Barker the Medaglia al Valore Militare d'Argento (Silver Medal for Valor).
In early April, 1918, Barker moved over to No. 66 Sqn, as a Flight Commander. With this squadron, he continued to help the British maintain their air superiority over Italy, downing one Austrian plane in April and eight more in May.
Duel with Linke-Crawford
At the end of May, he reputedly engaged in one of the great ace vs. ace duels of the First World War. Frank Linke-Crawford, born in Cracow, Poland. Some sources credit Barker with this victory; others credit it to pilots of the Italian 81a Squadriglia.
Piave Bridges
In mid-June, the Austrians staged their last large offensive in Italy, along the Piave River. The British air forces were shifted to meet the threat, as the Austrians threw pontoon bridges across the Piave. The Sopwith Camels, armed with machine guns and 20 pound Cooper bombs, tore into the floating bridges and infantry. Barker's flight attacked two bridges in the Montello sector, bombing the upstream bridge first. It broke apart, floated downstream, and carried away the lower span. They flew four missions on the 15th, strafing, bombing, and frustrating the Austrian engineers' effort to rebuild the pontoon bridges. This continued for two days, until heavy rains finally swept away the bridges for good. During this week of heavy aerial fighting, the Austrians lost over a hundred aircraft.
Later that month, Billy Barker, Lt. Gerald A. Birks, and Lt. Clifford M. "Black Mike" McEwen challenged the enemy pilots at Godega airfield to meet them in the air, by dropping a note to them. Captain Brumowski, Captain Navratil, and the other Austrian aces declined, but the British came by every morning for two weeks (as promised in their challenge) and bombed the enemy base.
139 Squadron - Brisfits
On July 14, 1918 the RAF formed a new Brisfit squadron, the 139th; Major Billy Barker was given command, but continued to fly his familiar Camel, #6313. With days the Bristol F.E.2 fighters were in action, shooting down nine Austrian planes in a week. By the end of July, Barker had 43 aircraft (including balloons) and a bar to his DSO. In August, he had the privilege of flying the visiting Prince of Wales over the front.
Victoria Cross
Two months before the end of the war, he was assigned to head up the fighter pilot school at Hounslow. Before starting, he wanted to gain some experience in the latest weapons and tactics then in use on the Western Front. The RAF gave him a Sopwith Snipe, the ultimate development of the Camel. An excellent aircraft, powered by a 230 h.p. Bentley, capable of climbing to 24,000 feet, and armed with two machine guns, it was as nimble as the famed Camel, but as docile as the lesser-known Dolphin. Less than 100 Snipes made it into combat, but it later became the standard RAF fighter in the 1920's.
In September, Barker flew his Snipe around the Front, downing three German planes. On October 27, he was ordered back to his training duties.
He took off in his Snipe, #E8102, started for England, but ended up in one of the most celebrated dogfights of WWI, actually five separate air battles. Over Bois de Marmal, he first encountered a Rumpler 'C' two-seat recon plane. Its skillful pilot and observer/gunner kept him at bay, and the gunner hit Barker's Snipe. Eventually Barker circled away and, relying on his accurate gunnery, fired from 200 yards, killing the gunner. He quickly scored more hits on the now-vulnerable Rumpler, breaking it up in the air.
But in his focus on his victim, he missed a Fokker that got behind him. The Fokker's gunfire smashed into his right leg. Although badly injured, Barker was able to get into a circling contest, which only ended when his bullets struck the Fokker's gas tank, setting the plane afire.
At this moment, Barker's third battle began, as he found himself in the midst of a flight of Fokker and Albatros biplanes patrolling at high altitude. Spandau guns opened up from every direction and another bullet smashed into his other leg. Somehow, he managed to shoot down two of these opponents before he fainted and went into a diving spin. The rush of air revived him and he came to, still in the midst of German fighters. As they all fired at him, he selected one opponent and flew right at him, guns firing. As they closed, he blew it apart and then realized that his left elbow had been hit too.
Virtually crippled, with three limbs shattered, he passed out again. For a second time, he revived amidst enemy aircraft, now quite low. Incredibly, he dispatched another DVII. As he struggled to reach the safety of the British lines, a German bullet struck his gas tank. Luckily, it didn't catch fire and Billy switched over to reserve. Seonds later, the Snipe crash-landed, skidding sideways and then flipping over. The men of a Scottish infantry regiment, who had witnessed his epic aerial battle, pulled him from the wreckage.
He had downed four enemy planes, taken several bullets, and survived to be awarded the Victoria Cross. He lay unconscious in the hospital in Rouen for two weeks. He received telegrams from King George V, the Prince of Wales, fellow ace Billy Bishop, and many others. Only his amazing constitution pulled him through; even so, he was partially crippled for the rest of his life.
Post War
In 1919, he returned to Canada and founded the short-lived Bishop and Barker Company, serving routes between Toronto and the Muskoka country in the north. Among other problems, the two aces caused a stampede with their ground-hugging aerobatics at the Canadian National Exhibition and were required to pay stiff damages to a woman who miscarried in the near-riot. The following year, he helped form the Royal Canadian Air Force; one of his early assignments was as liaison with the RAF, flying in Iraq and Palestine. In 1930, he was back in the private sector, President of Fairchild Aviation Company of Canada.
He died while test flying a new Fairchild two-seater at Rockcliffe Aerodrome, outside Ottawa.
Sources:
- The Aerodrome
- Heroes of the Sunlit Sky, by Arch Whitehouse, Doubleday, 1967
- The Canvas Falcons, by Stephen Longstreet, Barnes & Noble, 1970
No. 45 of the Osprey Aircraft of the Aces series. Thirty-six colorful profile plates of many types of aircraft, including Airco D.H.2, Bristol Scout, Spad S.VII, Sopwith Pup, S.E.5a, Nieuport 17, Sopwith Triplane, Bristol F.2B, Airco D.H.5, Nieuport 23, Nieuport 27, Sopwith Camel, Sopwith Dolphin, and Sopwith Snipe. Many original period photos, including a unique one of King George V inspecting RAF pilots (Ira 'Taffy' Jones among them) in August, 1918. After a chronological summary of British aerial combat in World War One, the book offers short biographies of over 50 Empire pilots: from England, Scotland, Wales, Ireland, Canada, South Africa, New Zealand, and Australia. |
 |